
5 Proven Ways to Recover Deleted Files from an SD Card on Mac

There's no doubt that SD cards remain one of the most popular storage devices today. Whether you use them in a camera, smartphone, or gaming console, they offer a convenient way to store and transfer files. However, human error is sometimes unavoidable. Accidentally deleting important files from an SD card can be frustrating, and many Mac users have experienced this firsthand. The good news is that there are multiple ways to recover files from an SD card on Mac. If you're currently dealing with data loss, this guide will show you how to safely get back lost files. Let's get started!
Can You Recover Deleted Files from an SD Card on Mac?
Compared to solid-state drives (SSDs), it's usually easier to recover deleted photos/videos from an SD card on a Mac. When you delete a file, the actual data isn't wiped immediately, which means there's still a chance to get it back. Acting quickly before new data is written over the old files can greatly improve your chances of recovery.
That said, it's not always possible to tell whether deleted files have been partially or fully overwritten. For example, if you remove 10 GB of data from an SD card and then write 10 GB of new files to the same card, the original data is very likely gone for good. Now, let's take a closer look at how to recover deleted files from an SD card on Mac for free!
How to Recover Deleted Files from SD Card on Mac for Free?
Option A: Recover Data from SD Card on Mac via 4DDiG
The easiest and most common way to recover data from an SD card on Mac is by using data recovery software. While many free tools claim to do the job, we highly recommend Tenorshare 4DDiG. With a success rate of 98.9%, this program is optimized for the FAT32 and exFAT file systems, which are used by most SD cards.
This SD card recovery tool supports a wide range of storage cards, including SD, SDHC, SDXC, and more. Plus, 4DDiG Mac can recognize over 2,000 data types, including photos, documents, videos, archives, and RAW files. Thanks to its clean and simple interface, you don't need any technical background to perform a recovery.
Here's an example of how to recover deleted photos/videos from an SD card on Mac with the aid of 4DDiG:
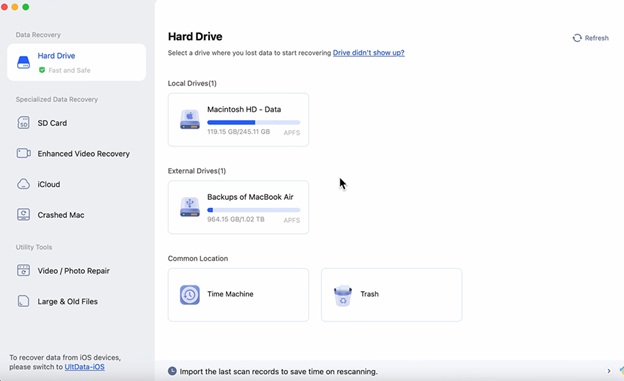
Step 1: Start by downloading and installing Tenorshare 4DDiG on your Mac. After the installation is complete, connect your memory card to the same computer. When the program opens, your SD card will appear on the main screen. Select it and click "Scan."
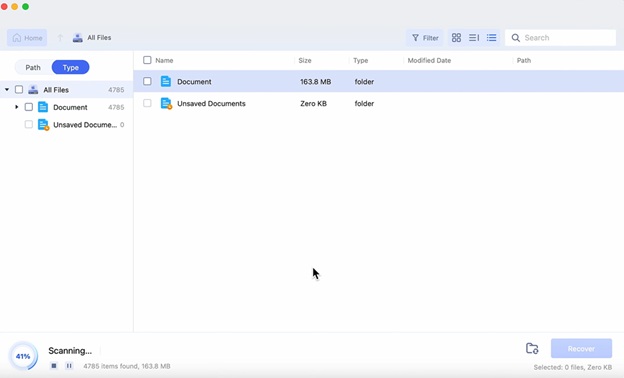
Step 2: 4DDiG will automatically scan the entire SD card for recoverable data. You don't need to wait for the full scan to finish. If you notice the files you want before the scan is complete, you can pause or stop the scan at any time.
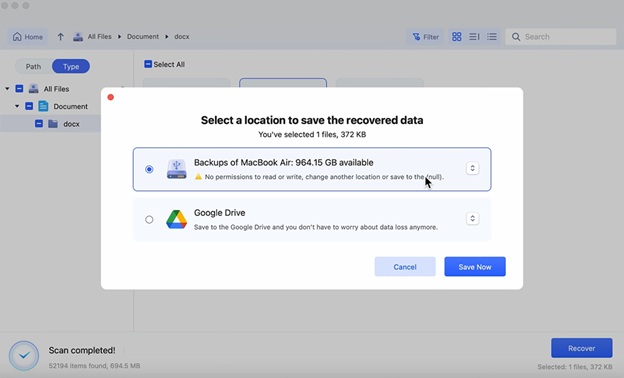
Step 3: Once you locate the files you want to restore, preview them to make sure they are recoverable. Then click "Recover" and save the files to a safe location on your Mac.
Option B: Recover Data from SD Card on Mac by RescuePro
Another reliable SD card data recovery software for Mac is RescuePro, developed by SanDisk. This tool usually requires a yearly subscription, but fortunately, SanDisk provides a free license for every customer who purchases one of their SD cards. You can find the license inside the SD card packaging. Once you launch the software, simply enter the serial number, and you can recover deleted files from an SD card on Mac for free. To do so:
Step 1: Launch RescuePro on your Mac, and then select the type of files you wish to restore.
Step 2: Connect your SD card. Once detected, choose it from the list of removable media. Click on the "Start" button to proceed.
Step 3: Once the scan is complete, you will see a list of files that can be recovered. The software automatically saves them to your Mac machine. To access your recovered files, hit the "Output Folder" button.
Option C: Utilize a Time Machine Backup
Looking for a way to recover files from an SD card on Mac? Give Time Machine a shot. Although this utility doesn't back up the card directly, it does save any files you copied from the SD card to your Mac in the past. Here's how:
Step 1: First of all, connect your Time Machine backup drive to your Mac. Open the folder where the SD card files were originally stored.
Step 2: Click the Time Machine icon in the menu bar, and then pick "Enter Time Machine."
Step 3: Once you locate the desired files, select them and click "Restore." After that, Time Machine will place the recovered files back into their original location.
Option D: Check Your Cloud Backups
Many users don't realize that their SD card files may have already been uploaded to the cloud before they were deleted. Services like iCloud, Google Drive, Dropbox, and OneDrive often run quietly in the background, automatically backing up or syncing files without any manual effort. So if you regularly import your SD card files to the Mac, it's worth checking these cloud services. The files you’re looking for might still be there, waiting to be restored.
What If None of These Methods Work?
If you still cannot recover data from an SD card on Mac, then it might be time to turn to professional data recovery experts. With advanced tools and specialized knowledge, their success rate far exceeds what typical software can achieve. Many people hesitate because of the cost, but spending a little money is often much better than losing irreplaceable files. You definitely don't want to lose your daughter's first steps, cherished family photos, or a client's wedding video you worked hard to capture.
Reputable data recovery services often offer a "no data, no fee" policy. Many also provide a free evaluation before you even send your SD card, so you can know whether recovery is possible without wasting time or money. That's everything related to Mac SD card recovery!
Conclusion
By now, you should no longer worry about how to recover deleted photos or videos from an SD card on Mac. Here, we've shared five simple and effective ways to get your files back, including using professional SD card recovery software for Mac. Keep in mind, no method is guaranteed—especially if the lost data has already been overwritten. To avoid future data loss, make it a habit to back up your memory card to the cloud or another external drive.